You are reading articles by Simplificator, a Swiss-based custom software development agency. Here we write about the problems we solve and how we work together.
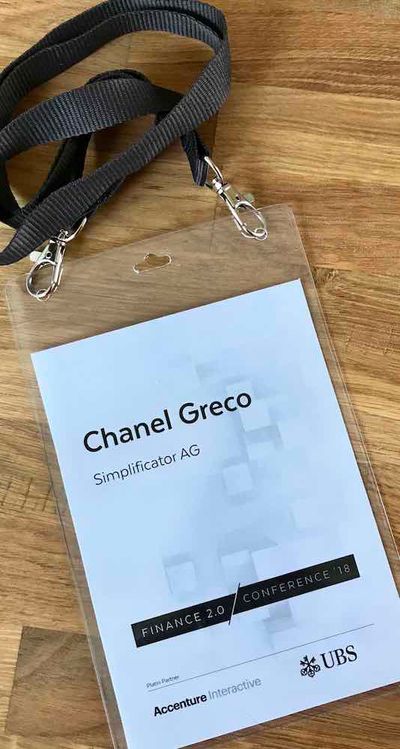
This week I had the pleasure of attending Finance 2.0, which is the leading FinTech conference in Switzerland. In this post, I’ll be sharing the content of the conference from a software developer point of view.
The Customer is King
The slogan of the conference was “Facing a paradigm change: From CRM, the classic Customer Relationship Management, to CMR, a Customer-Managed Relationship.“ That sums up really well what most of the speakers addressed: the customer is in the driver’s seat and if the financial institutions do not cater to their needs, they will lose their reason of existence. This paradigm change has motivated the industry to be innovative and launch products that the users want to use.
The saying “The Customer is King” is no news for software developers. We know that if the app or software we are designing is not what the users want, they will simply not use it. With consumer loyalty on the decline, the financial industry has begun to focus on customer-centric tools just as we have been doing in software engineering.
Open Banking
The topic “Open Banking” was mentioned frequently. More and more banks are letting third-party companies (mostly startups) access their financial institution via open APIs to develop innovative tools. There was a panel about the security risks associated with open banking and how to deal with it.
Open Banking is an interesting topic. The panel discussion clearly showed that a market potential exists for innovative startups or software developers building services in collaboration with financial institutions. As a software agency with a lot of experience in simplifying complex processes, these are interesting prospects.
ICO’s and blockchain
I was rather surprised that there weren’t more speeches about the possibilities the blockchain technology offers for the financial industry. Instead, in a panel discussion titled “ICO: A bubble or the future of funding?”, it was pointed out how crazy it is for startups collecting millions in investments without having produced anything except an unreadable white paper.
The underlying skepticism proofs that as a producer of digital products it’s not enough to simply groom oneself with the buzzword “Blockchain” to get into business with financial institutions. Only a valid business case can succeed in convincing potential customers.
Living innovation
I was thoroughly impressed by SIX Group and their innovation initiative. Here’s a large player in the financial industry not only talking about being innovative but actually living up to that claim. I particularly enjoyed the pitches from the winners of the SIXHackathon that took place the preceding weekend. The prototypes they developed in only 48 hours were very interesting and the level of (tech) talent from the team members was quite impressive.
Summary
The financial industry acknowledges that the times are changing and that it’s time to focus on the customer and their needs. Digital transformation is only one of the means to take this change into account, but it’s precisely what Simplificator is good at. These times are really exciting for us and we look forward to excelling our partners' businesses and making their customers happy.
As I’m writing this blog post, I’m ending my 6-month internship at Simplificator as a software developer. A month ago I turned 34. Yes, you read correctly, at an age where most employees are looking to boost their careers, I decided to go back to square one and learn how to code. But why did I choose to do so?
I’ve always been intrigued by computers, software and computer games. At the tender age of 15, I had to decide, what job apprenticeship I wanted to take up: office clerk or information technology. Back then most information technology apprentices were boys, and I felt that I would feel out of place as the only girl in a class of 20+ students. As you can imagine, I decided to go for the office clerk education.
Fast forward fifteen years: I had just quit my job at a Zurich-based Start-up and had to decide, what I wanted to do next. Go back to managing IT projects and earning good money or invest time and money and learn how to build software? Play it safe or risk it?
I decided to listen to my heart and take a risk, and so I embarked on a journey to learn how to code.
I first started by teaching myself HTML and CSS and it turned out to be a straightforward thing to learn. The next step was JavaScript...not so straightforward. I learned just enough JavaScript and jQuery to get by, but I wasn’t happy with neither my learning pace nor my learning success. I was beginning to doubt my risky decision, and so I decided to give it one more shot: I enrolled in the Master21 Coding Bootcamp.
At this boot camp it just all fell into place, and that has a twofold reason: first of all, the fantastic instructor Rodrigo and second the programming language Ruby. It was the first time I had the feeling I could realistically reach my goal of learning to code.
Thanks to my boot camp instructor Rodrigo, I was approached by Simplificator employees and encouraged to apply for a job as a software developer. The multiple interviews I had at Simplificator were pretty tough, and it became apparent that I wasn’t yet at the level of a junior developer. Simplificator saw potential in me and offered me an internship as a software developer. Needless to say, I jumped at this opportunity to deepen my coding skills.
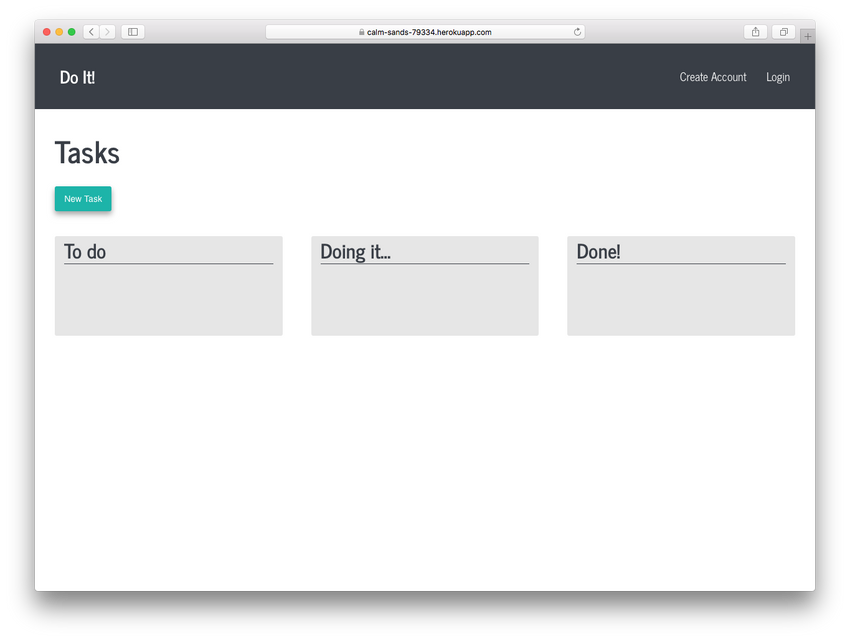
As a warm-up, I worked on my own little Ruby on Rails project and programmed a simple to do list. That work gave me the opportunity to both further my knowledge of Ruby and Ruby on Rails. I also learned how to use git and GitHub, Heroku, database management tools, IDE’s, etc.
I also got to do some frontend engineering on Simplificators own website.
My to do list built with Ruby on Rails
The next (big) step was building a productive tool for Simplificator. “Burn Rate” is crucial in planning our work on the different projects we work on. Thanks to the custom calculation formula, the software indicates how much time we have to work the next four weeks on the various projects to fulfill the requirements.
When the first development cycle of “Burn Rate” ended and we implemented it in production, I was so happy: Here was a useful tool programmed by myself (ok, I got some help here and there).
The third and last step was working on a project for an existing customer. It was challenging and exciting at the same time, as I worked on implementing new features in a previously existing web app. It was very helpful for my Ruby knowledge as I was reading and trying to understand code, which was written by other developers.
As the end of my internship approached the question arose “Should I stay or should I go?”. Well, I decided to stay and here’s why:
My internship made a developer out of me. But it will take time and lots of lines of code to make a good developer out of me.
My team here at Simplificator is simply awesome. They truly made a point of teaching me well how to go about when developing. Each team member is very different but we harmonize really well together.
My mentor Alessandro willingly shared his knowledge with me and always found the right words to motivate me. I’m sure I’ll learn a lot from him in the following years.
I believe in the philosophy of Simplificator:
Love what you do
Collaborate closely
Keep it simple
Dare to question
Get things done
I’m thankful for the chance Simplificator gave me.
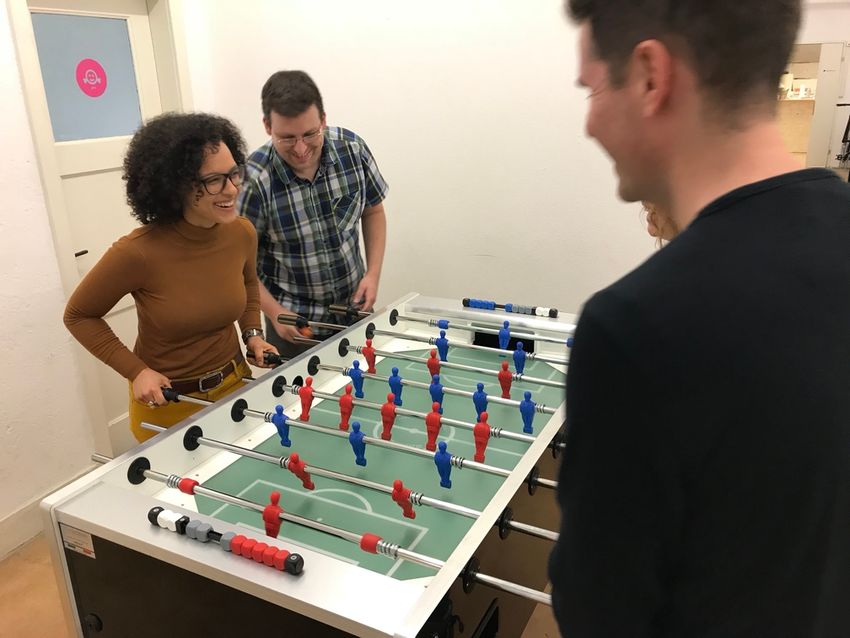
I love playing foosball with my colleagues.
Was it worth going back to square one at 34 years of age? Yes, it was! Was it easy? Not at all. But aren’t the difficult things the most rewarding?
This post is about how to setup a WiFi with a Raspberry Pi 3. It describes what packages you have to install and one example is shown how to configure them. In the end you will have an Raspberry Pi 3, which is connected through ethernet to the internet. The Pi provides an SSID and takes care that the traffic between WiFi and Ethernet is forwarded.
Before you unmount the flashed card, create a file named ssh in the boot segment on the disk. Otherwise you won't be able to SSH into the Raspberry Pi.
Installations
Connect the Pi to your local network (through ethernet), search for the little rascal (i.e. using nmap) and connect to it via ssh.
When logged in, you will have to install at least 2 packages: dnsmasq and hostapd. I always love to have vim, so here's what I did:
Behold, that I used the address 10.0.0.1 as static IP. We will have to use the same IP for the DHCP configuration.
At this point you should quickly restart the networking service.
sudoservice networking restart
ifconfig wlan0 should then show the applied changes on in the wlan0 interface.
Configure DNSmasq
The Pi will have to manage the clients IP address (DHCP) on the wlan0 interface. I used DNSmasq for the DHCP server, but it should work fine with any other DHCP servers.
Note that the Pi's static IP address is used for listen-address and dhcp-option=option:router. For more information about that, consider reading http://www.thekelleys.org.uk/dnsmasq/doc.html. ;-)
Portforwarding (route wlan0 to eth0)
The next step affects iptables. I am no expert in this, so I basically just copy pasted that stuff and ensured that the in -i and out -o parameters made sense.
sudo iptables -t nat -A POSTROUTING -o eth0 -j MASQUERADE
sudo iptables -A FORWARD -i eth0 -o wlan0 -m state --state RELATED,ESTABLISHED -j ACCEPT
sudo iptables -A FORWARD -i wlan0 -o eth0 -j ACCEPT
In a nutshell, it allows that general traffic/communication is allowed between the interfaces wlan0 (wireless) and eth0 (ethernet). In order that the iptables rules apply immediately, you'll have to do this:
sudo sh -c "echo 1 > /proc/sys/net/ipv4/ip_forward"
In order that the iptables rules are considered after reboot, edit /etc/sysctl.conf, and uncomment this line:
net.ipv4.ip_forward=1
Finally persist the iptables rules, otherwise they get truncated after reboot. I used a package iptables-persistent which persists the rules right during installation which is pretty convenient.
sudo apt-get install iptables-persistent
Configure the access point
Now it get's interesting. We can create our own SSID and define a password. Therefore create /etc/hostapd/hostapd.conf and paste and save this:
interface=wlan0 driver=nl80211
ssid=SIMPLIFICATOR-WIFI
hw_mode=g
channel=6
macaddr_acl=0
auth_algs=1
ignore_broadcast_ssid=0
wpa=2
wpa_passphrase=YOUR-INCREDIBLY-SECURE-PASSWORD
wpa_key_mgmt=WPA-PSK
#wpa_pairwise=TKIP  # You better do not use this weak encryption (only used by old client devices)
rsn_pairwise=CCMP
ieee80211n=1          # 802.11n support
wmm_enabled=1         # QoS support
ht_capab=[HT40][SHORT-GI-20][DSSS_CCK-40]
Let's connect the above config to the default hostapd config, edit /etc/default/hostapd and make sure DAEMON_CONF is uncommented and points to the config file.
DAEMON_CONF="/etc/hostapd/hostapd.conf"
Services (hostapd & dnsmasq)
Lastly, let's restart the services and enable them, so that the start automatically on boot.
sudo service hostapd restart
sudo service dnsmasq restart
sudo update-rc.d hostapd enable
sudo update-rc.d dnsmasq enable
That's it
You should now see a WiFi named SIMPLIFICATOR-WIFI and connect to it using the passphrase YOUR-INCREDIBLY-SECURE-PASSWORD, or whatever values you have given it.
Insights
While writing the blog post I had several insights:
Raspberry Pi 3 comes with an 2.4 GHz 802.11n (150 Mbit/s) WiFi. It's always good to know the limits of the bandwidth.
Even if you used a WiFi USB adapater with 1000 Mbit/s, the maximum speed would be 480 Mbit/s because of the USB 2 interface (!)
I wasn't able to configure the Pi, so that two WiFi dongles run simultaneously, so that you could extend the range of an existing WiFi without having the Pi connected to an ethernet cable.
When it comes to software versioning, you normally do not want to upload passwords or secrets into shared repositories. Too many people might have access to the code, and it's irresponsible to have secrets there without protection.
On the other hand, you actually do want to share such secrets among certain co-workers (the "circle of trust", implying that all other co-workers are not trustworthy 😉).
So, what we want are "protected" secrets in our versioning control system, that only the circle of trust has access to.
We are going to identify our files to be protect and encrypt them with Ansible. The encryption bases on a password, that we share with the people who may know our secrets. So, this password is chosen once and used for the same file "forever".
Encrypt 🔐
Let's say we store our secrets in a file named secrets.yml, and the content looks like this
favorite_artists:
- Lady Gaga
- Justin Bieber
- Kanye West
Obviusly no one should ever know that we like those artists, but the circle of trust may know, if necessary.
Now we can use ansible-vault encrypt to encrypt our secrets.
pi@raspberrypi:~ $ cat ./secrets.yml favorite_artists: - Lady Gaga - Justin Bieber - Kanye West
pi@raspberrypi:~ $ ansible-vault encrypt ./secrets.yml Vault password: # enter a vault password here Encryption successful
Behold where it asks to enter a vault password (# enter a vault password here). We've chosen a wise, complicated password (= foo), and can now share this with the people in the circle of trust.
Further, we can check in secrets.yml and upload it to our versioning control system.
Decrypt
Of course, at some point we will have to decrypt secrets.yml, we do this:
pi@raspberrypi:~ $ ansible-vault decrypt ./secrets.yml
Vault password:    # enter the vault password here
Decryption successful

pi@raspberrypi:~ $ cat ./secrets.yml
favorite_artists:
- Lady Gaga
- Justin Bieber
- Kanye West
That's the whole magic.
One more thing
Don't be confused that you'll get different contents of encrypted files, without changing the original content (and same vault password).
Eencrypt the file with foo twice, save the corresponding outputs to ./secrets1.yml and ./secrets\2.yml
pi@raspberrypi:~ $ cat ./secrets.yml favorite_artists: - Lady Gaga - Justin Bieber - Kanye West
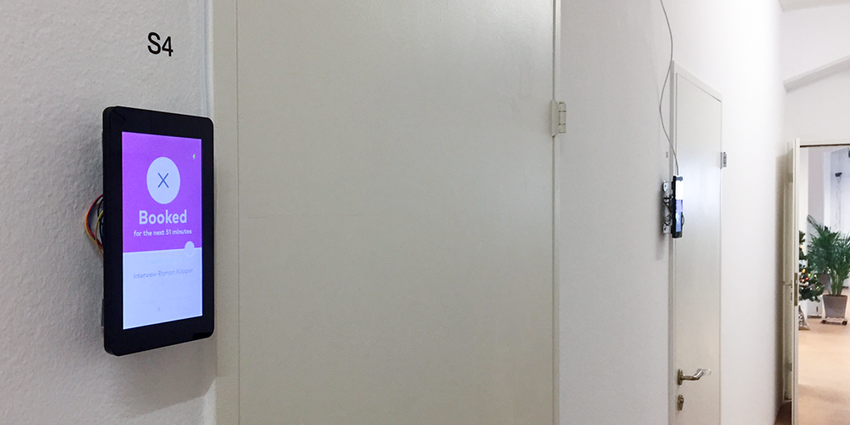
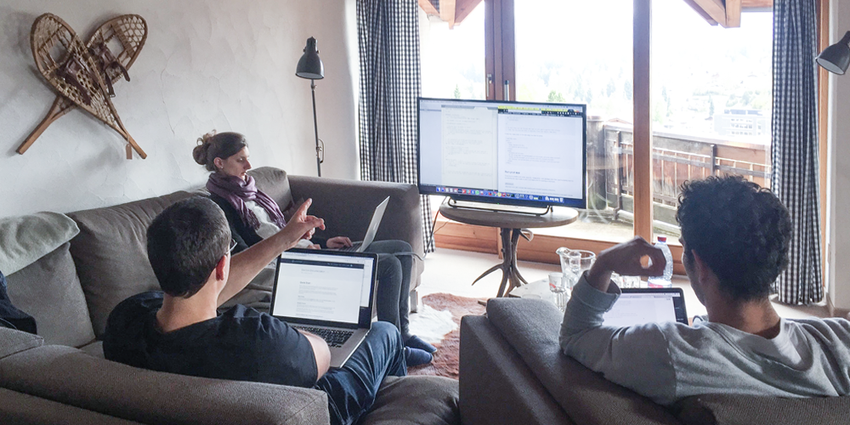
We have two meeting rooms at our Simplificator headquarter office in central Zurich. As they have opaque doors and no windows towards the aisle, it was often unclear whether a meeting room was occupied or not. Frequently, people opened the door and immediately apologized when realizing that there was an ongoing meeting. As an agile company we strive to reduce such nuisances and to improve our efficiency.
We, the “Smooth Operators” team, came up with an idea to improve the situation by mounting a display next to the door of each meeting room showing its occupancy. A 3-day retreat was planned to focus our efforts on this project.
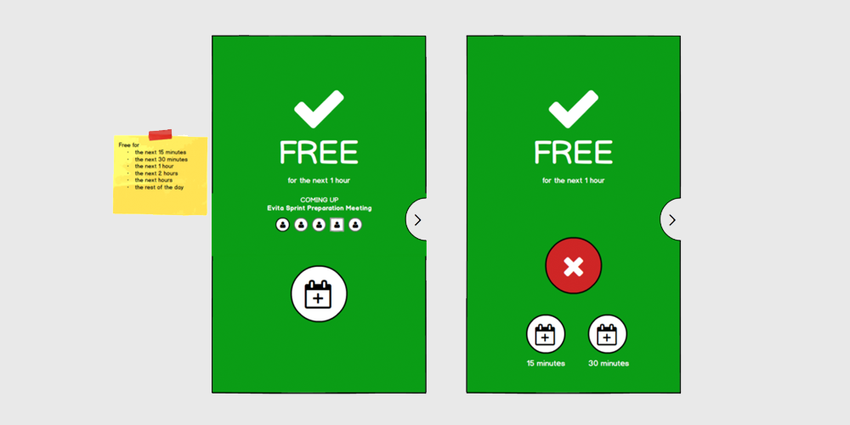
We decided to use a Raspberry Pi 3 with its official touch screen display. This allowed us to not only display information, but to make the system interactive. We started out by brainstorming the functionality we wanted to provide to the user. Most importantly, it should be obvious whether the meeting room was occupied or not. Scheduled meetings of the current day should be visible and we wanted to provide the ability to make a “quick reservation”, i.e. anonymously book the room for 15 or 30min. This feature is quite useful if you want to have a short ad-hoc talk or a quick phone call. As we already schedule meetings in Simplificator’s Google Calendar, we fetch booking data from the Google Calendar API.
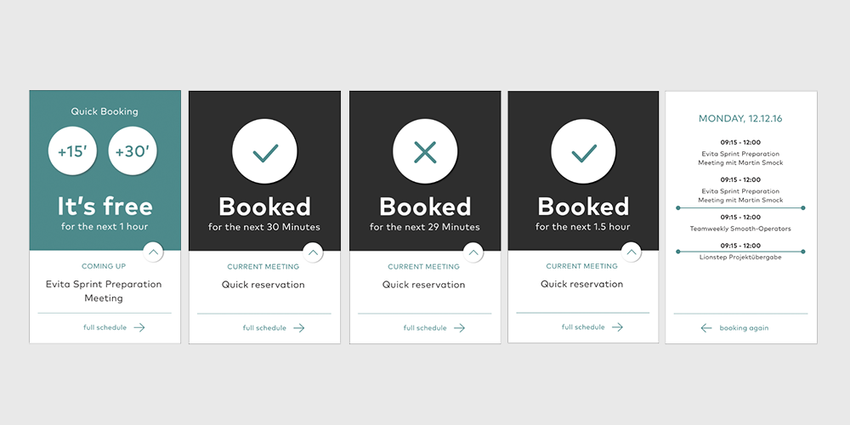
After defining the functionality, we created wireframes to clarify how many screens we would have to implement and what information and interactivity they should provide. We ended up having two screens: the main screen showing whether the room is free or busy and a screen showing all scheduled meetings of the current day. As the functionality and the screens were defined, our designer started to layout the screens and define its components graphically. We tested the design on the display of the Raspberry Pi regarding size and colors and performed quick user tests to finetune the behavior.
Each screen has several possible states (e.g. free and busy), so we decided to use an interactive web frontend technology. As retreats at Simplificator offer an educational component as well, we decided to create two versions of the app, one in React and one in Elm. To run the app in a kiosk mode on the Raspberry Pi, we chose to package our app with Electron.
After the three days of retreat we had two basic apps in React and Elm. For future maintainability we decided to go on with the React app. We mounted the Raspberry Pis and their display next to the meeting room doors, installed our app on them and tested for a while. We found some bugs to fix and improvements to implement. The app is now running quite smoothly and our meetings are free of disturbances!
If you want to rebuild this setup at your office as well, you find the required hardware components and a link to the app’s code below. Drop us a line and tell us how it is working out for you!
GraphQL is a query language for APIs and a runtime for fulfilling those queries with your existing data. GraphQL provides a complete and understandable description of the data in your API, it gives clients the power to ask for exactly what they need and nothing more, makes it easier to evolve APIs over time, and enables powerful developer tools.
What is Hanami?
Hanami is a Ruby MVC web framework comprised of many micro-libraries. It has a simple, stable API, a minimal DSL, and prioritises the use of plain objects over magical, over-complicated classes with too much responsibility.
The natural repercussion of using simple objects with clear responsibilities is more boilerplate code. Hanami provides ways to mitigate this extra legwork while maintaining the underlying implementation.
Project setup
If you haven't already done so, install hanami.
gem install hanami
After hanami is installed on your machine, you can create a new project. Feel free to chose another database or test framework if you like.
hanami new blogs --database=postgres --application-name=api --test=rspec
cd blogs
Define entities
Before we do anything at all, we need entities we can query over our API. Hanami offers a generator for entities which can be invoked by the following command:
hanami generate model author
This will generate an entity and the corresponding test. In this tutorial tests are omitted for brevity but you are encouraged to implement them on your own.
We start out with our author as it's a very simple model. It has a single attribute 'name'.
# lib/blogs/entities/author.rb
classAuthor include Hanami::Entity
attributes :name end
Next we're going to generate another model. A blog.
hanami generate model blog
For our blog, we want a title, content and an author_id to reference the author.
# lib/blogs/entities/blog.rb
classBlog include Hanami::Entity
attributes :title,:content,:author_id end
Update database
To be able to store entities, we need to define database tables to hold data. Create a migration for the author model first:
hanami generate migration create_authors
Hanami will generate a migration file with a current timestamp for you under db/migrations. Open the file and add the following:
Hanami::Model.migration do change do create_table :authorsdo primary_key :id column :name,String,null:false end end end
For blogs, we create another migration named create_blog.
hanami generate migration create_blogs
Inside the migration create another table with columns for our blog:
Hanami::Model.migration do change do create_table :blogsdo primary_key :id column :title,String,null:false column :content,String,null:false foreign_key :author_id,:authors end end end
To get the changes to our database, execute
hanami db create hanami db migrate
In order to be able to run database-backed tests, we need to ensure that the test database uses the same schema as our development database. Update the schema by setting HANAMI_ENV to test explicitly:
HANAMI_ENV=test hanami db create
HANAMI_ENV=test hanami db migrate
Now that our database is ready, we can go ahead and define mappings for author and blog. Go to lib/blogs.rb, find the mapping section and add mappings for the new entities.
## # Database mapping # # Intended for specifying application wide mappings. # mapping do collection :blogsdo entity Blog repository BlogRepository
attribute :id,Integer attribute :title,String attribute :content,String attribute :author_id,Integer end
attribute :id,Integer attribute :name,String end end
Introducing Types
After having defined our entities, we can now move on to create GraphQL types. First update your Gemfile and add the following line:
gem 'graphql'
and then run
bundle install
We're going to place type definitions in a dedicated directory to keep them separate from our entities. Furthermore those types are relevant for our web API only and not for the whole application. Create a directory in apps/api/ named types
mkdir-p apps/api/types
and update your web app's application.rb file to include type definitions in the load path.
Notice the require_relative statements at the beginning of some files. This is a workaround because, even though defined in the load path, types don't seem to be auto loaded inside a type definition file.
... and Action
Now that the schema definitions and load path are set up correctly, it is time to create the action that will serve query requests. To generate a new action invoke the following command:
hanami generate action api graphql#show --skip-view
Since we're providing the --skip-view flag Hanami will not generate a view class and template for this action. The above command will generate a new action where we place query logic.
# apps/api/controllers/graphql/show.rb
moduleApi::Controllers::Graphql classShow include Api::Action
defcall(params) query_variables = params[:vairables]||{} self.body =JSON.generate( BlogSchema.execute( params[:query], variables: query_variables ) ) end end end
To let Hanami know that it shouldn't render a view, we set self.body directly inside the action.
Query the API
In order to see the API working, we need data! Fire up your hanami console and create some author and blogs.
hanami c
Now create one or more authors and save it to database via AuthorRepository:
Go ahead and play around with the query. If you look at the type definition for QueryType you'll notice, that it should be possible to query for authors, too. Can you get the API to list all blog titles for a given author?
That's it. This introduction should give you a glimpse into Hanami and GraphQL. You can find more information in the section below.
When I finished my Master in Economics in September 2014, I didn't want to take on some random office job where I do the same every day. I wanted a job where I have to learn something every day and where I have to keep up to date with what I do. I then decided to take on a 50% accounting job, in order to make a living, and meanwhile, I decided to learn programming. I started with online tutorials and practised on my own. However, I soon realised that, at some point, I didn't get any further. I had a basic knowledge about data structures and control structures, but I had no idea where I would have to use them in a real project.
In early 2015, I then looked at different companies and it soon became clear to me that I wanted to work at Simplificator. When I called to ask for an internship, I was told that Simplificator doesn't have any internship positions. I then thought about applying at a different company, but I really just wanted to work at Simplificator. So I sent an email to Lukas (the CEO), asking again. They then invited me for a short interview and they agreed that I could start a 50% internship the next week.
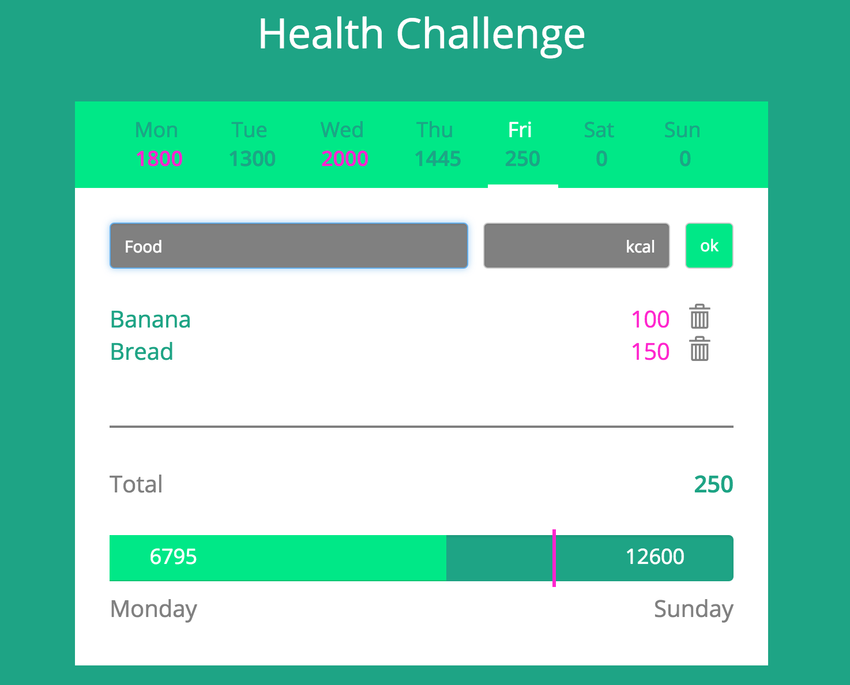
During my internship, Tobias was my team lead and instructor. He taught me about classes, methods, design patterns and much more. Especially at the beginning, I had to learn a lot of different technologies: Ruby, Rails, SQL, HTML, CSS etc. Soon, I started my own little project, which was a calorie tracker. The calorie tracker was a very good way to learn new things as the project developed. I started with the backend, so that the business logic was implemented as discussed with the "client", who was Tobias. The frontend didn't look nice at all. I only used it to test if my backend works as intended. I then received a design from our designer Marcel, which I had to implement. This was very important, because I knew that it also works like this in real projects.
This is what the calorie tracker looked like after I implemented the design:
Later, I wrote unit tests and integration tests, as well as controller tests for the calorie tracker. As a next step, users were introduced, so several people would be able to use the calorie tracker. This was quite tricky for me, because I had never worked with sessions before. But again, I knew this would be important in real projects, too. Next, there should be a date picker, where the user could jump to the requested day.
Another requirement was that the user should be able to add a new entry without the page needing to reload every time. This was probably the hardest part, as I had to learn jQuery and the concept of AJAX at the same time. However, it worked out and the user experience was much better than before.
I really liked the calorie tracker project, because I learned so many things that would be useful in later real-life projects. Also, it was nice to see that the calorie tracker developed along with my programming skills. I implemented the easiest features in the beginning and they became much more fancy, as I learned new concepts and technologies. I also had a small insight of how a real project would work. I had to deal with the customer not yet being sure about what he really wants and thus, with changing requirements. It was a great way to develop my programming skills.
I want to thank Tobias for his great guidance to smooth operating, clean code and coding methodology. I learned so much in this year that I will be able to use for my whole programming career now. But it was not only Tobias who was helpful to me during my internship. Actually, everybody at Simplificator was always happy to help me with questions and giving me guidance in everything they could. I am still so happy to have had the opportunity for this internship, even though such a position didn't actually exist. This is exactly how I perceived Simplificator from the beginning: People are always open for new ideas, even from outside people like me, at that time.
Since September, I have been working at Simplificator as a full-time Junior Software Developer, and I am working on much more challenging projects now. It is always interesting and I am still learning every day. Just like I always wanted :-)
I was really excited to go to EuRuKo 2016, because it was the first time for me to attend an event such as this. The conference was on Friday and on Saturday, and we arrived on Thursday morning to discover Sofia. As it turned out, the city is quite small, so a few hours were enough to do so. We then ran into some other Swiss guys who attended the conference (Pascal among them) and when they were talking about past conferences, I really couldn't wait anymore for the next day.
The EuRuKo started with the key note of Matz. He talked about the Ruby community and about how Ruby is designed to make programmers happy. He wants to keep the core features from Ruby, while at the same time keeping up with the development of the technologies and the needs of the programmers. "I don't want the Ruby community to be dead. I want it to keep moving forward!", he said. He also spent some time talking about Ruby 3 and its incredible new features (like partial type inference, called "duck typing"), and then finished off by saying that we will not get it for some years :-).
Another talk that I really liked was "Little Snippets" from Xavier Noria. He showed real code examples that are often used in practice, and their much simpler and more readable counterparts. This was especially great for me as a junior developer, because I didn't know about some of these easier way to write code. When seeing it, it makes total sense. For example, he mentioned the order of code snippets really matters. If you write it the same order that your brain logically conceives it, another person can read it in one flow, and will understand it right away. Here is an example:
This order doesn't really make sense, if you think about the natural flow of a project. Normally, you first create an instance of a class. Later you might update it, and finally, you might delete it. Therefore, this code snippet should really look like this:
You might say this is a detail. But we should write code the way our brains can conceive it as natural. This also makes it easier if another person has to work on or maintain the code we wrote.
The official party of the conference was on Friday, and it was absolutely great. I met so many new people from different countries and everybody was so nice. I then understood what many people have told me before: the Ruby community is an exceptional one. Later, there was a vote about where the EuRuKo should be hosted in 2017. It was a close call between Rome and Budapest. In the end, Budapest got the most votes. So I will of course be there in 2017.
On Saturday, there was a talk about "The consequences of an Insightful Algorithm" by Carina C. Zona that really touched me. She talked about the consequences an algorithm can have on a person's life. One example was a story about a large online shop that sent promotion mail about pregnancy products to a young woman. Her father was shocked and called the online shop, complaining that they sent mail like this to his daughter. Some days later, he called again, apologising to them, because his daughter was indeed pregnant. Carina discussed about the difficulty of how far data collection should go and to which extent it is morally defensible to use it in order to make profit. Her talk can be viewed at this link: Carina C. Zona: Consequences of an Insightful Algorithm | JSConf EU 2015
There was another talk on Saturday by André Arko that made me think a lot. He was talking about Ruby Together and how their last year was. At Ruby Together, they maintain the Ruby infrastructure, such as Bundler and RubyGems. André said that they lack volunteers to help working on the maintenance, as well as funds to pay professional developers to do so. He told the following story: the RubyGems site was down and a lot of developers contacted him, saying that they would be willing to help getting it up again. Once everything was back to normal, he contacted these people, asking them if they would be willing to help with the general maintenance. Zero of these people agreed to do so. This was really surprising to me. We all need the technologies to work, but I guess also in our free time. People tend to take these things for granted. However, the infrastructure doesn't maintain itself. I knew that Simplificator already supports Ruby Together, and I then decided to do so too, as a private person. It costs $40 each month and I think that is not too much, considering that I use these technologies every day. Please consider making a contribution too!
The two conference days were over pretty quickly, and I am very happy to have met so many new and interesting people. I am already looking forward to the RubyDay in Florence at the end of November. And of course, I will also be at EuRuKo 2017 in Budapest next year.
In Ruby you can define methods on a class in various ways. Include, extend, inherit or define on the class. If you have multiple method definitions, which one is called? Which one is the super definition? Pascal has written a post on the Ruby method lookup path that explains this.
You might think Process.kill(15, PID) works but it fails with the same error.
The KILL signal however works:
irb(main):004:0> Process.kill("KILL",768) =>1
The questions is: does it work correctly?
Let's run some tests. I ran the following script for testing:
Open an irb instance and run:
command ="tracert www.google.com" exitstatus =nil Open3::popen3(command)do|stdin, stdout, stderr, wait_thread| puts "PID: #{wait_thread.pid}"# ===> this will give you the PID. status = wait_thread.value puts "============" puts "termsig=#{status.termsig.inspect}" puts "success?=#{status.success?.inspect}" puts "stopsig=#{status.stopsig.inspect}" puts "stopped?=#{status.stopped?.inspect}" puts "signaled?=#{status.signaled?.inspect}" puts "exitstatus=#{status.exitstatus.inspect}" puts "exited?=#{status.exited?.inspect}" puts "status.inspect=#{status.inspect}" exitstatus = status.exitstatus puts "============" end puts exitstatus.inspect
From a different irb session run the following:
pid ='XXX'# printed in the code above Process.kill("KILL", pid)
Here are the results I got:
# KILL Force Windows with Process.kill("KILL", pid)
# PID: 2816
# ============
# termsig=nil
# success?=true <======= wrong on Windows, it was a force kill
# stopsig=nil
# stopped?=false
# signaled?=false
# exitstatus=0 <======== wrong on Windows, it was a force kill
# exited?=true
# status.inspect=#<Process::Status: pid 2816 exit 0>
# ============
What is even worse is that if you run the command again and wait until it finishes (thus noProcess.kill), the output is exactly the same.
This means we cannot rely on Process.kill("KILL", PID) on Windows to stop a process. Please correct me if I am wrong but to me the two outputs above look the same.
I performed the same test (only changed the command tracert to traceroute) on OSX and here are the results:
Without Process.kill, the command finishes successfully: